
I discovered today that Microsoft is targeting their Online Services (Office 365) at small and medium sized businesses (SMB's) and BDC had an article that recommended SharePoint Online as an affordable way to host your small business website. This seemed like an ideal first topic for this blog.
Let's take a look at what it took to get a website going.
Step 1: Getting an Office 365 Trial
As affordable as Office 365 is ($6 USD per user per month), I decided to go the trial route to make sure it was a good fit.
I started off at the Microsoft Office 365 home page and, after quickly reviewing pricing and features, clicked on the giant "Free Trial" button.

This brought me to a very simple page asking which trial was right for me. The answer was pretty obvious, "Professionals and small businesses."

The trial signup took me all of about 90 seconds before I was presented with the welcome screen.

Step 2: Finding my Website
Scrolling to the very bottom led me to what I was really looking for. "View your public-facing website".


First impression? The admin page is... busy. But still accessible!


Step 3: Understanding SharePoint
The first thing to note is that if you look at the address bar in the browser, you'll see we moved from 'portal.microsoftonline.com' to '<your username>.sharepoint.com'. This is SharePoint. Much like the Matrix, I can't tell you exactly what SharePoint is but I can tell you that it is where your new website is going to be built and stored.
What we're looking at on this page is a 'Library' that contains all the pages that make up your new website. Microsoft has kindly got us on our way with a few sample pages. We can easily remove these pages if we don't want them, or create new pages as we need them.
Step 4: Understanding the Page Editor
Getting my first page ready would be easy since I've got these samples to work with. To get started, I just clicked on the page titled 'Home'.

This brings us to the surprisingly easy page editor.
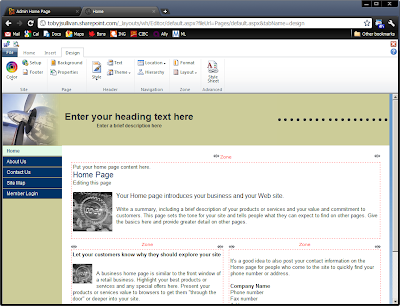
Before I dive into how to use the page editor, let's take a quick moment to discuss how SharePoint pages work.
Templates vs. Page Content
The first point to know is that a page is split into two parts, a template and the page content. Templates are shared between many pages (usually all pages on a smaller site like the default site here or the site we are going to design). The page content is the part of the page that is different for every page. This graphic demonstrates how the default home page is split up.

Page Layouts
The Page Content section of every page is split into multiple sections called "zones". The number, size and organization of these zones is defined by the "layout" selected for the current page. There is a menu in the Design ribbon that lets you conveniently change the layout for the current page and we'll talk more about that later.
Step 5: Setting Up the Template
Heading
Let's make this page ours with an appropriate heading. Clicking the default heading (which reads "Enter your heading text here") once will open the heading editor.

You can immediately see your changes reflected in the editor but what exactly will site visitors see? If you look at the very top-left corner of the editor you will see two small buttons.

- The left-most button is labelled "Save your changes and publish them to the web". This will immediately make your changes visible to anyone who visits your site.
- The button to the right is a bit more magical and is labelled "View how your Website will look to visitors." This is a very useful button because it allows us to save our changes, but doesn't make them visible to everyone yet. This might not be important at this stage of the game, but in the future you'll likely find yourself making changes and wanting to preview them before you commit to publishing them.
Click the preview button to see our new heading on the website.

Once we're satisfied with our shiny new heading, we can close this preview page to return to the editor.
Other template components you can customize are the navigation menus (using the "Location" menu in the Design ribbon of the editor) and the footer which you can create with the "Footer" button in the Design ribbon.
Look and Feel
The next step in personalizing this website is establishing a look and feel that suits your business. There are three menus in the Design ribbon that you are going to want to use for this.
- "Color" lets you select a color scheme for the entire website. There are 42 pre-defined color schemes that are all quite slick. If one of these doesn't tickle your fancy, you can define your own.
- "Style" gives you a set of header layouts to choose from that let you organize the various header elements.
- "Theme" allows you to select from an amazingly large array of provided graphics to be used in the heading or, if you have some better alternatives, upload your own.
You can combine these three elements to produce an endless array of possible designs that best fit your needs.
If you're curious, here's how my site ended up looking after a couple minutes of effort.

Step 6: Adding Page Content
I don't have a lot of content for my home page, certainly not enough to fill three zones, so I'm going to start by changing the layout of my page. To do this, I click the "Layout" menu in the Design ribbon and select the layout that is one giant box.

This results in all the content from the three default zones being stuck in the single zone. Since I don't want any of the default content, I can just select it all, right-click and delete it.

Now that I have a clean slate, I'll add my content. All the text-formatting options you might be looking for are in the "Home" ribbon at the top.


Step 7: Page Management
Back at the Pages library, it's time to remove a couple default pages I have no interest in. To do this, I check the "About Us" and "Site Map" pages. Checking these pages automatically switches to the Pages ribbon which presents me with the "Delete" button. Goodbye!

Conclusion
Looks like my micro-site is all done! In less than an hour I've got a simple online presence and with the desire and a couple hours this could be a much more substantial website.
SharePoint is an extremely powerful tool and it looks like Microsoft has made it available and completely reasonable for small businesses looking for a website. At $6/month, this really can't be beat. And the rest of the features in the Office 365 suite are pretty useful as well.
Do you have a small business, professional, or personal website? Where is it hosted and how is that working out for you?